Session Sweep Playbook • London + NY Open
How to Trade the London Sweep of the Asian Range (and the NY Sweep of London/Asia) with Elev8+
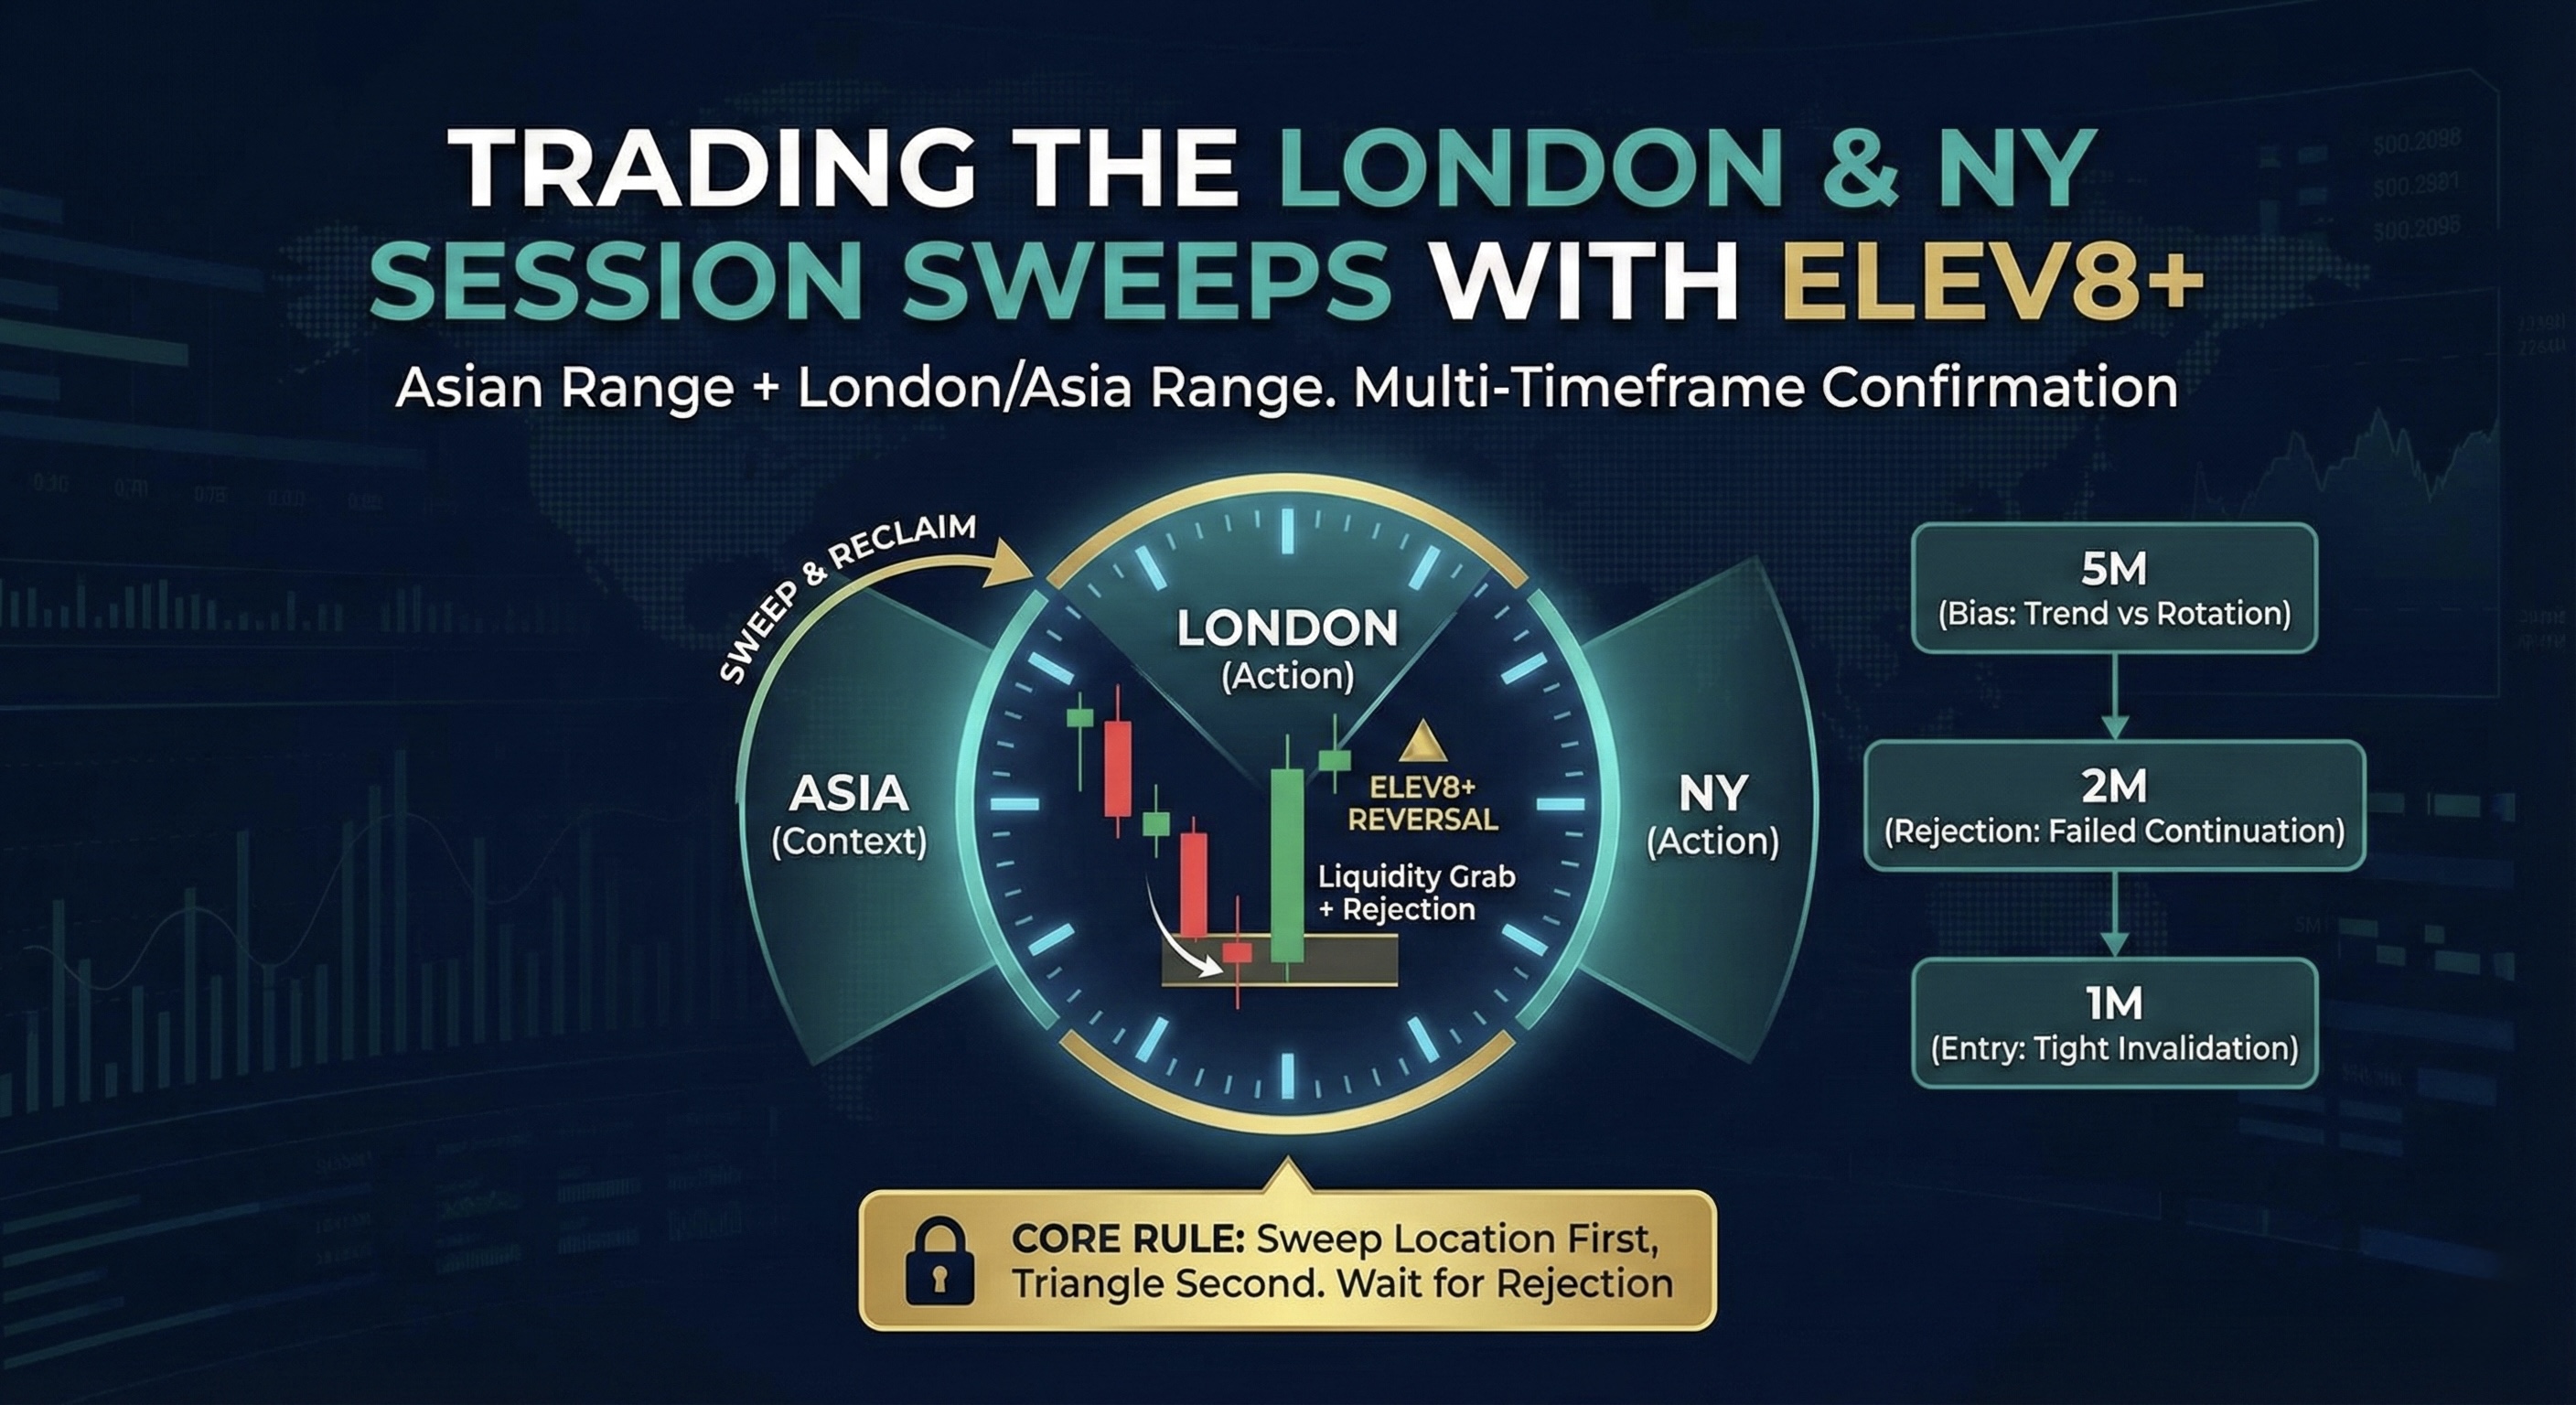
The London open and NY open frequently “tap” obvious prior-session highs/lows to trigger liquidity, then either reject back into range (high-probability reversal) or accept and trend (breakout day). This guide shows how to use Elev8+ Pro reversal triangles/LS and liquidity sweep context with a simple multi-timeframe process (5m → 2m → 1m) to enter early with tight invalidation—without fighting real breakouts.
Suite context
You can trade this playbook with Elev8+ Pro alone, but the full suite improves clarity: Market Map confirms where the true magnets/session structure are, Market Extremes confirms whether you’re at a boundary vs mid-range chop, and Momentum Gaps helps map rotation paths/targets after rejection confirms.
Educational content only. Not financial advice. No performance guarantees.
Core idea
Sweeps work best when price runs stops at session extremes and then reclaims back inside (rejection).
Multi-TF process
Use 5m for bias/regime, 2m for rejection vs acceptance, and 1m for tight entries and invalidation. Market Map / Extremes / Gaps are optional context layers that strengthen the same process.
Big filter
Don’t fade if price accepts outside the range (multiple closes + level holds). That’s usually breakout behavior.
Example 1: London sweeps the Asian high (NQ • 5m)

Why London and NY Sweeps Happen (and Why They Matter)
Session ranges (especially Asia and London) form clean, obvious highs and lows. Those boundaries attract liquidity: stops, breakout entries, and resting orders cluster around them. When London opens—or when NY cash session approaches— price often “tests” those obvious levels to gather liquidity and either:
- Reject back inside the prior range (sweep-and-reverse), or
- Accept outside the range and continue (true breakout / continuation).
The best mindset
Elev8+ is most effective when you treat triangles as triggers inside a liquidity story—not as random buy/sell signals. Use the suite to add clarity: Map confirms the magnet, Extremes confirms boundary vs chop, and Gaps maps the rotation path once rejection confirms.
The Two Setups You’re Targeting
1) London Sweep of the Asian Range
- Level: Asian session high/low (the range boundary).
- Event: London probes beyond the boundary (liquidity grab / stop run).
- Edge: quick rejection + reclaim can create tight-risk entries.
2) NY Sweep of the London/Asia Range (Around Market Open)
- Level: London high/low and/or combined London+Asia extremes.
- Event: NY open often sweeps remaining liquidity before choosing direction.
- Edge: the first clean reclaim after the sweep can be the day’s best R:R.
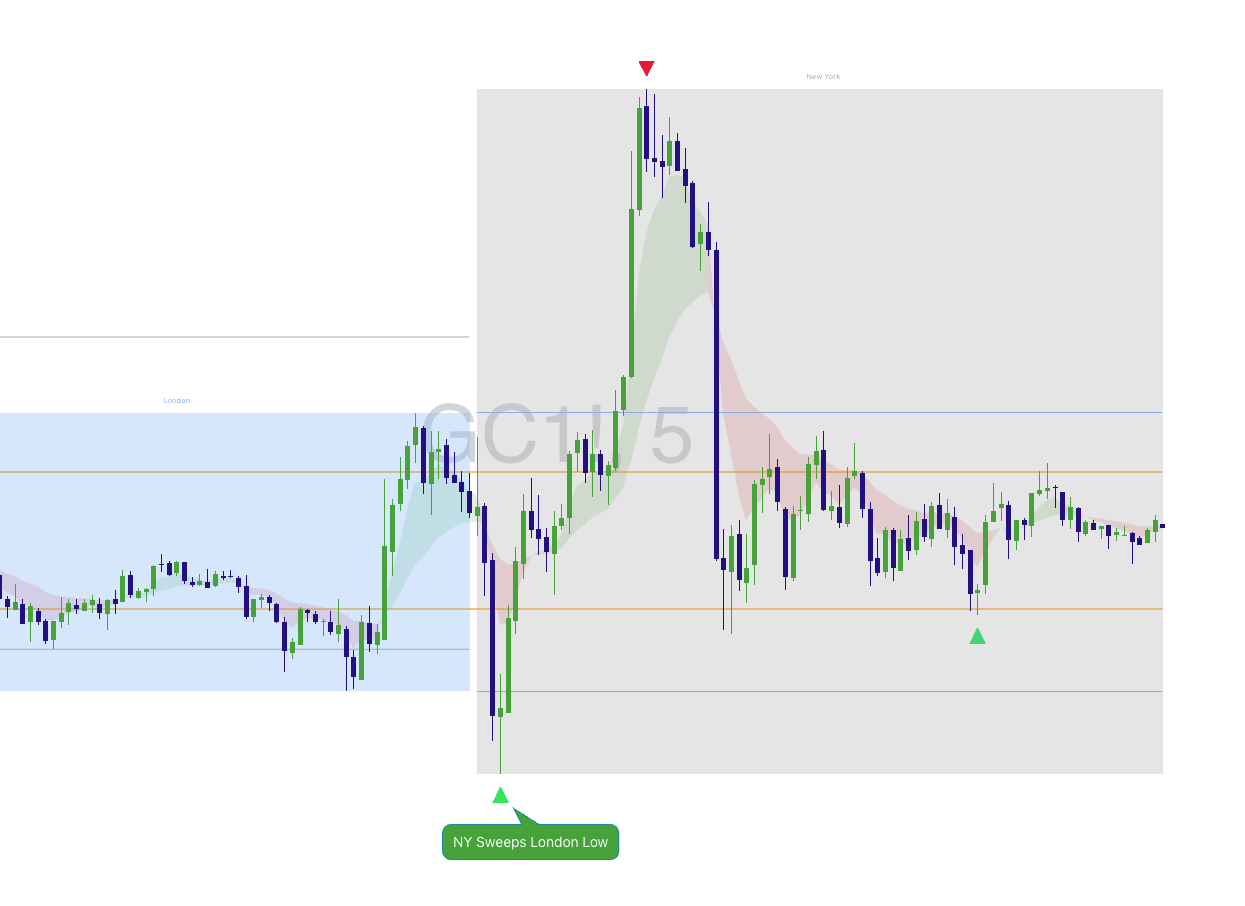
Example 2: NY sweeps the London low (Gold • 5m)
The Core Rule: Sweep Location First, Triangle Second
The triangle is most valuable when it prints at/near a meaningful sweep location (prior session high/low), and you also have evidence of rejection. Prioritize signals that meet at least two of these:
- At or just beyond Asia/London highs/lows (obvious liquidity pools).
- After a clear sweep event (stop run / wick-through / fast probe).
- With reclaim back inside the range (rejection evidence).
Optional suite filter (fast)
• Market Map: is this level a real session/HTF magnet?
• Market Extremes: are we at a boundary vs mid-range chop?
• Momentum Gaps: is there a clean rotation path once it reclaims?
• Elev8+ Pro: does the triangle/LS print at the right location?
Multi-Timeframe Confirmation: 5m Bias, 2m Rejection, 1m Execution
Step 1: 5m = Bias (Are We Trending or Rotating?)
- Mark Asia high/low (and later London high/low).
- Determine market state: strong trend vs range/rotation.
- If 5m is in strong acceptance/continuation, be cautious fading.
Optional: Use Market Extremes here to avoid fading mid-range conditions. Sweeps are highest-quality when they occur near a boundary.
Step 2: 2m = Rejection vs Acceptance (Is the Sweep Failing?)
On 2m, you want to see the sweep fail, not build acceptance:
- Close back inside the range or back under/over the swept level.
- Failed continuation attempts outside the level.
- Micro structure shift: the sweep leg stops making progress and breaks its own momentum.
Optional: If Momentum Gaps shows price driving cleanly through gaps/inefficiencies away from the level with no reclaim, that’s often acceptance behavior—don’t fade it.
Step 3: 1m = Entry Timing (Get In Early With Tight Invalidation)
- Use 1m to time entry after reclaim/rejection.
- Use a clear invalidation beyond the sweep extreme.
- Avoid chasing mid-range triangles with no liquidity story.
Optional: Use Market Map (magnets/VWAP) and Momentum Gaps (rotation checkpoints) to plan targets before you enter.
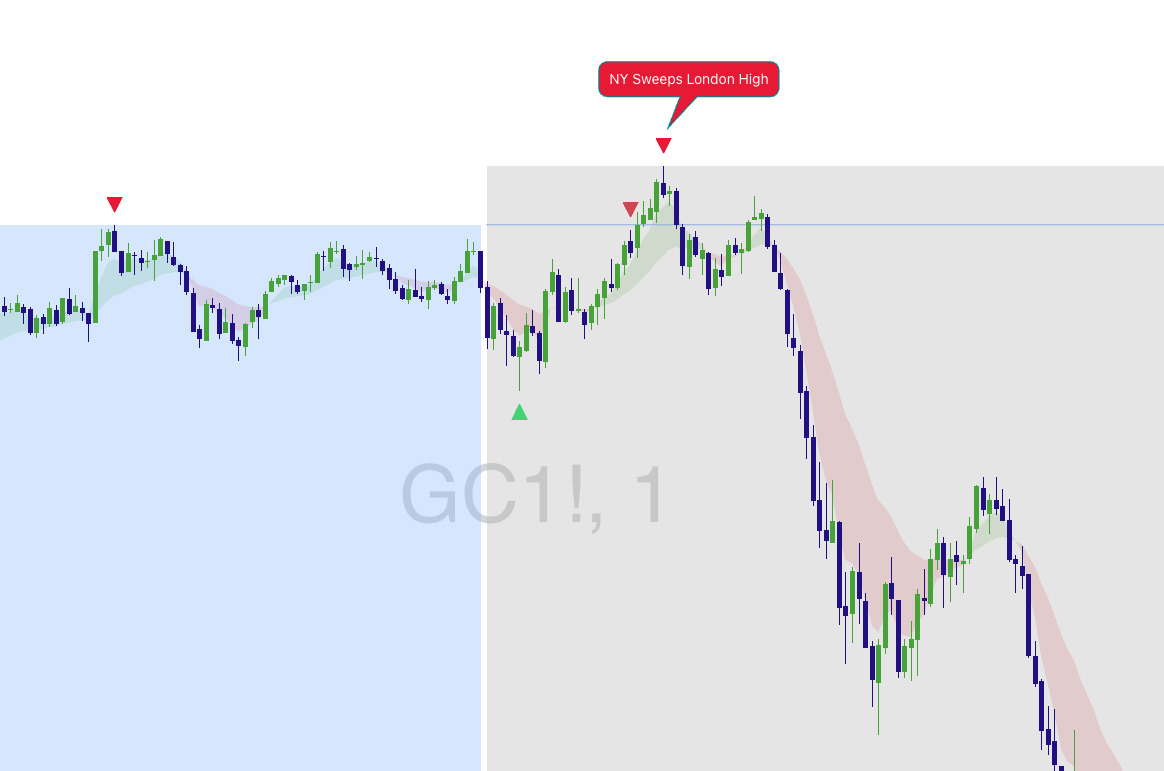
Example 3: 1m execution after a NY sweep (Gold • 1m)
Rejection Checklist (use this before entering)
• A prior-session high/low was clearly swept.
• Price reclaims back inside the range/level zone.
• Triangle prints near the sweep zone (not mid-range).
• Invalidation is clear (beyond sweep extreme).
• 5m does not show strong acceptance/continuation.
• Follow-through begins (not immediate re-sweep).
• Market Extremes suggests you’re near a boundary (not mid-range chop).
• Momentum Gaps shows a clean rotation path/targets after reclaim.
If you cannot define invalidation, you do not have a clean sweep trade—only a guess.
How to Avoid Going Against a Real Breakout (When the Indicator Is “Wrong”)
Not every sweep reverses. Sometimes the sweep is the beginning of acceptance and continuation. Your job is to identify acceptance behavior early and exit quickly.
Breakout / Acceptance Warning Signs
- Multiple closes outside the range (not just wicks).
- Pullback holds the swept level as support/resistance (level flip).
- No snapback: price doesn’t quickly return inside after the sweep.
- Momentum persists: continuation candles keep expanding away from the level.
Sweep Decision Tree (simple)
Step 1: Did price sweep the session extreme?
Step 2: Did it reclaim inside the range quickly?
If YES: look for triangle + rejection entry with tight invalidation.
If NO: treat it as acceptance/breakout risk and avoid fading.
Stops and Targets (Keep It Objective)
Invalidation (Stop Loss)
- Short after sweep-high rejection: stop beyond the sweep high.
- Long after sweep-low rejection: stop beyond the sweep low.
Targets (Range Logic)
- First target: back to the range boundary / first obvious magnet.
- Second target: mid-range / VWAP / prior consolidation.
- Runner: opposite side of the session range if momentum continues.
Optional: Use Market Map for magnet/VWAP context and Momentum Gaps to define “rotation checkpoints” on the way to your mean target.
Common Mistakes (and the Fix)
- Mistake: taking triangles mid-range with no session context. Fix: only prioritize signals at session extremes.
- Mistake: fading strong 5m acceptance. Fix: require reclaim + rejection behavior first.
- Mistake: wide stops on “tight-risk” setups. Fix: if invalidation is far, the setup isn’t clean.
- Mistake: entering on first touch. Fix: wait for reclaim, then use 1m timing.
Want to see sweep setups on real charts?
Use Elev8+ to map session extremes, highlight sweeps, and time reversal triggers—then apply the rejection/acceptance rules above to keep risk defined and avoid fading breakouts.
Indicators and examples are for education only. Always define risk and trade only what fits your plan.